สร้างไฟล์คำตอบอัตโนมัติ สมัยก่อนเรียก Answer File แต่สมัยนี้เค้าเรียก autounattended.xml
อ้างอิงจาก http://technet.microsoft.com/en-gb/library/cc771670(WS.10).aspx
ตัวอย่าง Unattended Files = http://go.microsoft.com/fwlink/?LinkId=122642
1. ที่เครื่อง W7-01 ให้ทำการนำแผ่น DVD ของ Windows 7 ใส่เข้าไป จากนั้นเข้าไปหา Folder Source เพื่อทำการ Copy \Sources\Install.wim เอาไปไว้ที่ Local Disk ของ W7-01 ในที่นี้สร้าง Folder Temp ไว้ที่ C:\ รอไว้ก่อนแล้ว
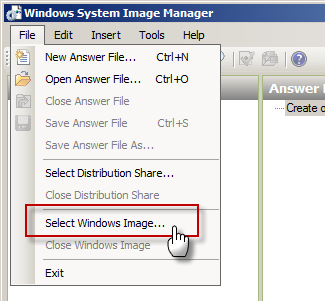
2. จากนั้นทำการเปิดโปรแกรม Windows System Image Manager เข้าไปที่ Files Menu Click Windows Image. เปิดไฟล์ install.wim จาก Temp Folder
ระบบจะอ่านค่า install.wim เพื่อสร้าง Template เบื้องต้น
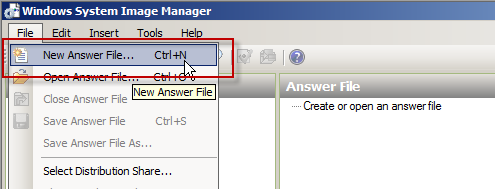
จากนั้นเริ่มทดลองสร้าง Answer Files ได้ด้วยการคลิกที่ File Menu > New Answer File
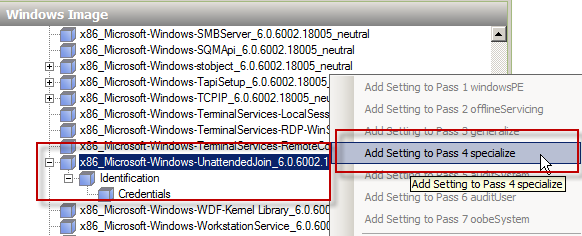
จากนั้นอยากสร้าง Option ไหนก็ลองค้น ๆ ดู ถ้าเลือกได้อันที่ชอบก็จัดการ Add Setting (มันเป็นเครื่องมือช่วยสร้างคำตอบที่เราอยากจะตอบไว้ล่วงหน้า) ง่ายดี แค่ลากสิ่งที่เราอยากจะกำหนดไว้แล้วเลือกใส่คำตอบไปได้เลย
อ้างอิงการสร้าง answer file ได้ที่นี่ http://technet.microsoft.com/en-us/library/dd349348.aspx
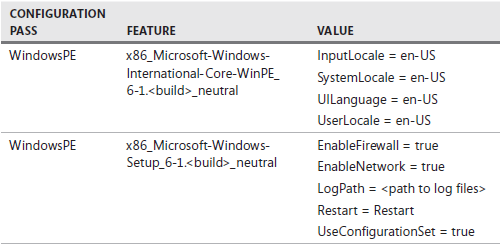
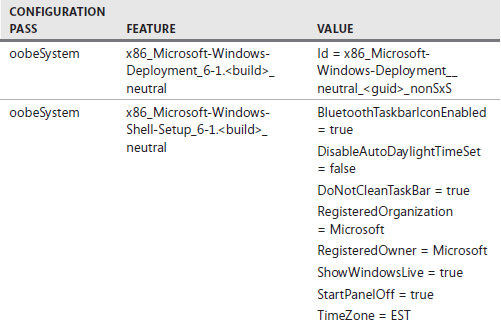
ตารางที่จำเป็นต้องหัดใส่เอง แบบ Basic
ตารางที่จำเป็นต้องหัดใส่เอง แบบ Advance
| Pass | Component | Value |
| 1 WindowsPE | Microsoft-Windows-International-Core-WinPE | InputLocale = <Input Locale> For example, en-US
SystemLocale = <System Locale> For example, en-US UILanguage = <UI Language> For example, en-US UserLocale = <User Locale> For example, en-US |
| 1 WindowsPE | Microsoft-Windows-International-Core-WinPE\SetupUILanguage | UILanguage = <UI Language> For example, en-US |
| 1 WindowsPE | Microsoft-Windows-Setup\DiskConfiguration | WillShowUI = OnError |
| 1 WindowsPE | Microsoft-Windows-Setup\DiskConfiguration\Disk | DiskID = 0
WillWipeDisk = true |
| 1 WindowsPE | Microsoft-Windows-Setup\DiskConfiguration\Disk\CreatePartitions\CreatePartition | Order = 1
Size = 80000 Type = Primary |
| 1 WindowsPE | Microsoft-Windows-Setup\DiskConfiguration\Disk\CreatePartitions\CreatePartition | Extend = true
Order = 2 Type = Primary |
| 1 WindowsPE | Microsoft-Windows-Setup\DiskConfiguration\Disk\ModifyPartitions\ModifyPartition | Active = true
Format = NTFS Label = System Order = 1 PartitionID = 1 |
| 1 WindowsPE | Microsoft-Windows-Setup\DiskConfiguration\Disk\ModifyPartitions\ModifyPartition | Format = NTFS
Label = Windows Order = 2 PartitionID = 2 |
| 1 WindowsPE | Microsoft-Windows-Setup\ImageInstall\OSImage | InstallToAvailablePartition = false
WillShowUI = OnError |
| 1 WindowsPE | Microsoft-Windows-Setup\ImageInstall\OSImage\InstallTo | DiskID = 0
PartitionID = 2 |
| 1 WindowsPE | Microsoft-Windows-Setup\UserData | AcceptEula = true |
| 1 WindowsPE | Microsoft-Windows-Setup\UserData\ProductKey | Key = <product key>
WillShowUI = OnError |
| 4 Specialize | Optional: Microsoft-Windows-IE-InternetExplorer | Home_Page = <Company Home Page> |
| 7 oobeSystem | Microsoft-Windows-Deployment\Reseal | ForceShutdownNow = false
Mode = Audit |
| 7 oobeSystem | Microsoft-Windows-Shell-Setup\OOBE | HideEULAPage = true
ProtectYourPC = 3 |
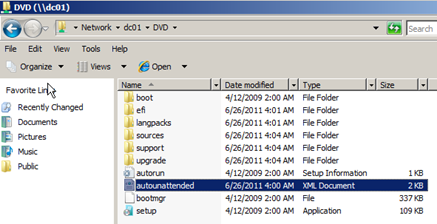
ทำการ Save Unattend File เป็น autounattended.xml ในรูปตัวอย่างผมได้ Save Files autounattended.xml ไว้ที่ C:\DVD จากนั้นก็ทำการ Copy DVD Windows 7 เข้าไปไว้ใน Folder c:\DVD จึงได้ข้อมูลตามรูปด้านล่าง
จากนั้นสั้ง Share Folder DVD พร้อมรอการเรียกติดตั้ง ดูเรื่อง Share Permisssion ให้ดีนะครับ
สั่ง Setup ด้วยคำสั่ง setup.exe /unattend:i:\autounattended.xml จากนั้นก็นั่งรอ ^ ^




![[Tips] แก้ปัญหา Font ตัวเล็กใน Edge แบบถาวร](https://www.mvpskill.com/wp-content/uploads/2018/05/windows10_rez2.jpg)






![[Review] การสอบ Microsoft Certification จากที่บ้าน](https://www.mvpskill.com/wp-content/uploads/2020/04/cert3-218x150.jpg)

![[สรุปงาน] งานสัมนา Power Platform ว่าด้วยการนำ Power BI / Power Apps / Power Automate (Microsoft Flow) ไปใช้แก้ปัญหาในที่ทำงาน](https://www.mvpskill.com/wp-content/uploads/2020/01/Power-Platform-Website-218x150.png)
